


Eurosens Dash resistive fuel level sensor emilator is designed to control the fuel gauge on the dashboard. Eurosens Dash reads the fuel level (volume) value via the RS-485 interface and the LLS protocol.
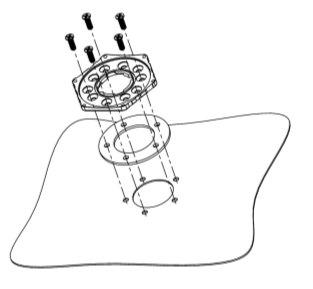
A typical application of the device is when installing a capacitive Eurosens Dominator RS fuel level sensor instead of a standard float resistive sensor of a truck directly into its hole. This eliminates the procedure for drilling the tank. In this case, the Eurosens Dash emulator is connected in parallel with the GPS tracker.  Eurosens Dash also generates a signal to control the low fuel alarm lamp.
What you need to know about Eurosens Dash.
- Make sure that the dashboard fuel gauge is designed to work with the resistive fuel level sensor. If Eurosens Dash is used to replace the signal of a vehicle sensor, make sure that this sensor is resistive (measure the sensor resistance at different float positions).
- Eurosens Dash reads fuel level values using LLS protocol in “read only” mode. To generate a control signal, it is necessary that there is a RS485-polling data logger (GPS tracker) in the RS485 network, which polls the installed fuel level sensor using the LLS protocol. Sensor responses are received simultaneously by the GPS tracker and the Eurosens Dash emulator.
- To configure Eurosens Dash for various indicators, the emulator is connected to a PC via the RS485 interface (using the Eurosens Destination 02 (CAN) service adapter or another RS485 / USB interface). The setting is carried out by the service software “Eurosens Dash configurator”.
PC connection
- Red wire – power supply (24 V)
- Brown wire – Vehicle ground.
- Yellow wire – RS 485 A to the fuel level sensor and RS485-USB adapter : RS485 A wires.
- Green wire – RS 485 B to the fuel level sensor and RS485-USB adapter : RS485 B wires.
- White wire – to the fuel level gauge on the dashboard.
- Black wire – to the low fuel level alarm lamp of the dashboard.
Start the configurator. In the program window, click the COM Port Select button and select the port used by the adapter.

Then click Connect, and Find device.

The progress bar of the search will appear. After the device will have been founded in the program table, you can click the Disconnect button and then immediately Connect. Switch Auto polling off.
The Read button allows you to read the stored value from Eurosens Dash.
The Write button saves the value into device memory.

Settings section contains the following lines:
1. Fuel level sensor address – the address of the sensor being read by the emulator.
2. Maximum value of sensor (100%) – maximum output value of the fuel level sensor. Here you should enter the maximum value from the settings of the sensor output signal, which corresponds to a full tank.
3. 0% -100% scale (1-65535) – five lines with with the calibration table. Dashboards in cars are different and the fuel level gauge works nonlinearly. These values are selected empirically. Having an empty tank according to the fuel level sensor choose the value so dashboard fuel gauge will point to zero. At 25%, you need to choose a value corresponding to the quarter of the tank on the dashboard gauge.. For half a tank, 75% and a full tank, do the same. Do not forget to click the Write button after making changes. In this case, the emulator generates a signal corresponding to the entered value – and you can immediately see the reaction of the fuel gauge to the selected value, and correct it if necessary.
Inversion option is required to work with reverse indicators.
For example, using the dashboard from a Renault car, we have set following values

0% Scale – value 1200

25% Scale – value 2100

50% Scale – value 2900

75% Scale – value 3800

100% Scale – value 6700


We are in social media
Facebook
LinkedIn
Youtube